ctcLink Tutorials
Follow these step-by-step tutorials to help guide you through using ctcLink.
Account Activation
Activate your ctcLink accountLearn how to activate your ctcLink account in this tutorial. This process can only be done on a desktop or laptop. Please follow all instructions carefully. |
You can hover or click on the included screenshots in the Desktop tutorial for a magnified view | ||
 |
Step 1Navigate to https://myaccount.ctclink.us/. From there, under the login area, click "Activate Your Account". Navigate to https://myaccount.ctclink.us/. From there, under the login area, click "Activate Your Account". |
||
 |
Step 2When this popup appears, click "OK". When this popup appears, click "OK". |
||
 |
Step 3
Next, enter your **first name, last name and date of birth. For the "ID type", choose:
Once you've entered everything, click "Submit". If your legal name is a single name—such as Pran, Madonna or Nani—you must enter a hyphen (-) in the First Name field and enter your single name in the Last Name field.
Next, enter your **first name, last name and date of birth. For the "ID type", you will choose "*SID (old)" if you have not yet recieved your ctcLink ID. If you do not remember your SID, use the SID Lookup tool If you have recieved your ctcLink ID, then choose "ctcLink ID" and enter your ctcLink
ID number. Once you've entered everything, click "Submit". If your legal name is a single name—such as Pran, Madonna or Nani—you must enter a hyphen (-) in the First Name field and enter your single name in the Last Name field. |
||
 |
Step 4
On the next page, enter the email you would like to use as your primary email address. This can either be your go.shoreline.edu email, or a different email. Either way, make sure you have continued access to that email account. Next, choose a security question from the list and type in your answer. We recommend entering a phone number if you should need to recover your account. Enter your phone number in either the SMS or Voice phone number field. Finally, create a password and enter it in both password fields. Then click "Submit."
On the next page, enter the email you would like to use as your primary email address. This can either be your go.shoreline.edu email, or a different email. Either way, make sure you have continued access to that email account. Next, choose a security question from the list and type in your answer. We recommend entering a phone number if you should need to recover your account. Enter your phone number in either the SMS or Voice phone number field. Finally, create a password and enter it in both password fields. Then click "Submit." |
||
 |
Step 5
The next screen will say "your account has been activated". BEFORE CLICKING ANYTHING ON THIS PAGE, COMPLETE THE NEXT STEP. If you are not seeing this message box, click here to learn how to enable popups in your browser.
The next screen will say "your account has been activated". BEFORE CLICKING ANYTHING ON THIS PAGE, COMPLETE THE NEXT STEP. If you are not seeing this message box, click here to learn how to enable popups in your browser. |
||
 |
Step 6
In this box, you will see the phrase "This is your ctcLink ID: #########". Choose a way to save this number. This is a 9 digit number, please make sure you have all 9 digits saved. Write down your ctcLink ID, take a screenshot, or paste it into an email that you send to yourself. Make sure you have saved your ctcLink ID somewhere, as it will be your username to log into the ctcLink system. Then click "OK".
In this box, you will see the phrase "This is your ctcLink ID: #########". Choose a way to save this number. Write down your ctcLink ID, take a screenshot, paste it into an email that you send to yourself. Make sure you have saved your ctcLink ID somewhere, as it will be your username to log into the ctcLink system. Then click "OK". |
||
Forgot to save your ctcLink ID? |
|||
Additional ResourcesCongratulations, you've successfully activated your ctcLink account! If you had any trouble completing this tutorial, or have additional questions please check out our additional resources here. |
Login to ctcLinkClick here to login to ctcLinkctcLink for StudentsThe ctcLink for Students page has resources on troubleshooting, help sessions and moreShoreline Support CenterIn the Shoreline Support Center you can view self help articles, chat with an agent and submit support request tickets |
Registration
Enroll in classes [7 steps]Learn how to enroll in classes with ctcLink in this tutorial. |
You can hover or click on the included screenshots in the Desktop tutorial for a zoomed-in
view
Choose Tutorial Type:
|
||
  |
Step 1After logging into ctcLink, open the sidebar menu and click "Class Information". After logging into ctcLink, open the sidebar menu and tap "Class Information". |
||
  |
Step 2In the "Class Information" submenu, click "Class Search". In the "Class Information" submenu, tap "Class Search". |
||
  |
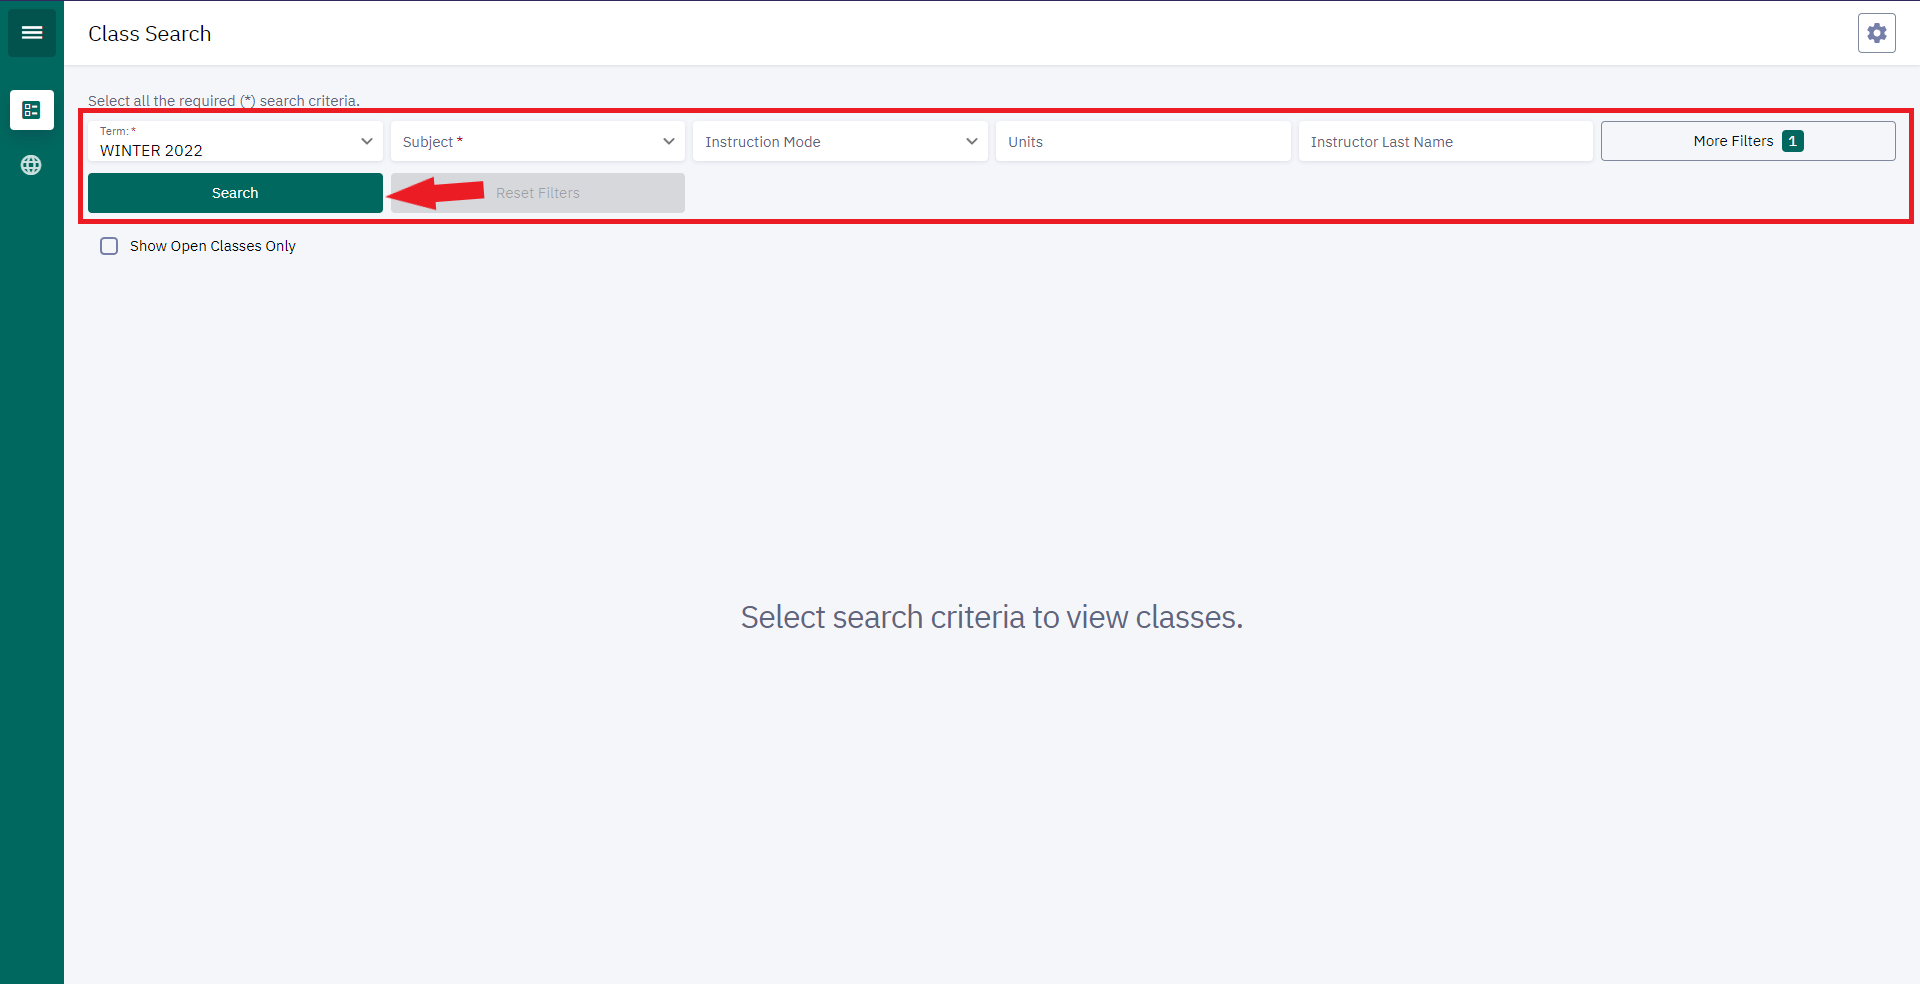
Step 3Next, set your filters for the class you are trying to find. Once your filters are set, click "Search". Next, set your filters for the class you are trying to find. Once your filters are set, tap "Search". |
||
  |
Step 4Next, click the "section" of the class you're looking for. Next, find the "section" of the class you're looking for and tap "View". |
||
  |
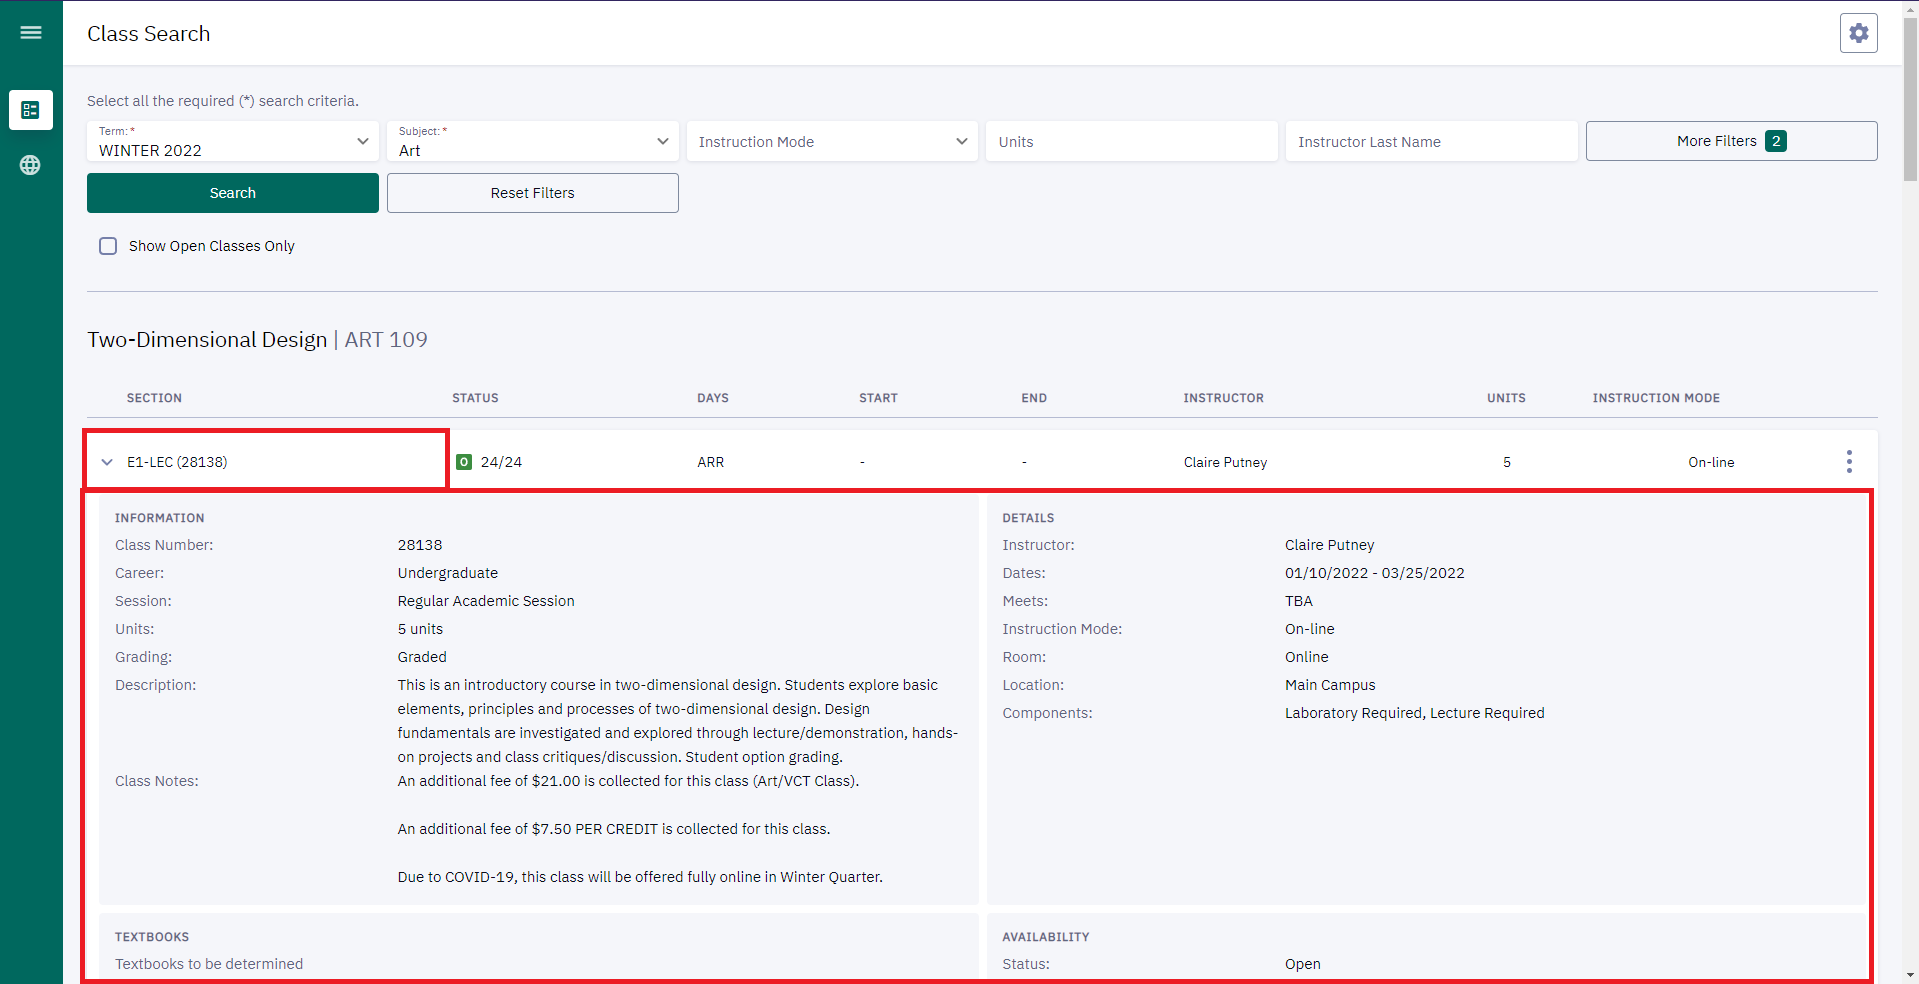
Step 5This will show all of the relevent information about that class. Once you've reviewed this information, click "Enroll". This will show all of the relevent information about that class. Once you've reviewed this information, tap the three buttons at the bottom of the page, then tap "Enroll". |
||
  |
Step 6You will see a popup with a "Permission Number" field and a "Start Date" field. Next, if you'd like to be added to the waitlist if the class is full, check the appropriate checkbox. Then tap "Save". |
||
  |
Step 7
You will see another popup titled "Enrollment Results". If you see that the result says "Added to your schedule", you have registered successfully! Click "OK" at the bottom of the popup. If you're not seeing "Added to your schedule" under "Results", you may want to visit our additional resources at the bottom of this walkthrough for more help. Click "OK" at the bottom of the popup.
You will see another popup titled "Enrollment Results". If you see that the result says "Added to your schedule", you have registered successfully! Tap "OK" at the bottom of the popup. If you're not seeing "Added to your schedule" under "Results", you may want to visit our additional resources at the bottom of this walkthrough for more help. Tap "OK" at the bottom of the popup. |
||
Additional ResourcesIf you had any trouble completing this tutorial, or have additional questions please check out our additional resources here.
|
Login to ctcLinkClick here to login to ctcLinkctcLink for StudentsThe ctcLink for Students page has resources on troubleshooting, help sessions and moreShoreline Support CenterIn the Shoreline Support Center you can view self help articles, chat with an agent and submit support request tickets |
Add yourself to a waitlist [6 steps]Learn how to add yourself to a waitlist for a class in ctcLink with this tutorial. |
You can hover or click on the included screenshots in the Desktop tutorial for a zoomed-in
view
Choose Tutorial Type:
|
||
  |
Step 1First, click "Class Information" in the sidebar menu. First, tap "Class Information" in the sidebar menu. |
||
  |
Step 2Next you can either search or browse for the class you're looking for. In this tutorial, we will be using the "Class Search" menu item. Next you can either search or browse for the class you're looking for. In this tutorial, we will be using the "Class Search" menu item. |
||
  |
Step 3On the search page, fill in your filters and click "Search". On the search page, fill in your filters and tap "Search". |
||
  |
Step 4Once you've found the class you're looking for, open the class information and click the "Enroll" button at the bottom. Once you've found the class you're looking for, tap the three dot icon next to the "View" button. In the menu that appears, tap "Enroll". |
||
  |
Step 5Next, you'll see a popup dialogue asking if you'd like to be added to the waitlist if the class is full. Make sure this checkbox is checked, then click "Save". Next, you'll see a page asking if you'd like to be added to the waitlist if the class is full. Make sure this checkbox is checked, then tap "Save". |
||
  |
Step 6Finally, if you have successfully been added to the waitlist for this class; you'll see a confirmation that the class has been added to your schedule. If you don't see this confirmation, you'll be presented with an error message explaining why. Finally, if you have successfully been added to the waitlist for this class; you'll see a confirmation that the class has been added to your schedule. If you don't see this confirmation, you'll be presented with an error message explaining why. |
||
Additional ResourcesIf you had any trouble completing this tutorial, or have additional questions please check out our additional resources here.
|
Login to ctcLinkClick here to login to ctcLinkctcLink for StudentsThe ctcLink for Students page has resources on troubleshooting, help sessions and moreShoreline Support CenterIn the Shoreline Support Center you can view self help articles, chat with an agent and submit support request tickets |
View Waitlist [3 steps]Learn how to view your waitlisted classes in ctcLink with this tutorial. |
You can hover or click on the included screenshots in the Desktop tutorial for a zoomed-in
view
Choose Tutorial Type:
|
||
  |
Step 1First, open the sidebar menu. Then click "Enrollment". First, open the sidebar menu. Then tap "Enrollment". |
||
  |
Step 2Next, click "View Wait List" in the "Enrollment" submenu. Next, tap "View Wait List" in the "Enrollment" submenu. |
||
  |
Step 3Here you can view your waitlisted classes, what position you have in the waitlist and the deadlines for those classes. Here you can view your waitlisted classes, what position you have in the waitlist and the deadlines for those classes. |
||
Additional ResourcesIf you had any trouble completing this tutorial, or have additional questions please check out our additional resources here.
|
Login to ctcLinkClick here to login to ctcLinkctcLink for StudentsThe ctcLink for Students page has resources on troubleshooting, help sessions and moreShoreline Support CenterIn the Shoreline Support Center you can view self help articles, chat with an agent and submit support request tickets |
Drop Classes [6 steps]Learn how to drop classes with ctcLink in this tutorial. |
You can hover or click on the included screenshots in the Desktop tutorial for a zoomed-in
view
Choose Tutorial Type:
|
||
  |
Step 1Once you've logged in, open the sidebar menu and click "Enrollment". Once you've logged in, open the sidebar menu and tap "Enrollment". |
||
  |
Step 2In the "Enrollment" submenu, click "Drop Classes". In the "Enrollment" submenu, tap "Drop Classes". |
||
  |
Step 3Next, select the correct quarter for the classes you're dropping. Then, use the checkboxes on the right hand side of the screen to select which classes you'd like to drop. Next, select the correct quarter for the classes you're dropping. Then, use the checkboxes on the right hand side of the class to select which classes you'd like to drop. |
||
  |
Step 4Once you've selected the classes you'd like to drop, click the "Drop" button in the top right hand corner of the screen. Once you've selected the classes you'd like to drop, tap the "Drop" button in the top right hand corner of the screen. |
||
  |
Step 5You'll be presented with a popup asking you to confirm that you would like to drop the classes you've selected. Click "Drop" to continue. You'll be presented with a popup asking you to confirm that you would like to drop the classes you've selected. Tap "Drop" to continue. |
||
  |
Step 6
Next you'll be presented with with your "Drop results". If all of your entries says "Success", the selected classes have been dropped. If you're seeing a message other than "Success", you should chat with a support agent or submit a support ticket. Make sure you include a screenshot of the message you recieved.
Next you'll be presented with with your "Drop results". If all of your entries says "Success", the selected classes have been dropped. If you're seeing a message other than "Success", you should chat with a support agent or submit a support ticket. Make sure you include a screenshot of the message you recieved. |
||
Additional ResourcesIf you had any trouble completing this tutorial, or have additional questions please check out our additional resources here.
|
Login to ctcLinkClick here to login to ctcLinkctcLink for StudentsThe ctcLink for Students page has resources on troubleshooting, help sessions and moreShoreline Support CenterIn the Shoreline Support Center you can view self help articles, chat with an agent and submit support request tickets |
Swap Classes in ctcLinkLearn how to swap classes using ctcLink in this tutorial. |
You can hover or click on the included screenshots in the Desktop tutorial for a zoomed-in
view
Choose Tutorial Type:
|
||
  |
Step 1First, login to ctcLink. Then, open the sidebar menu and click "Enrollment". First, login to ctcLink. Then, open the sidebar menu and tap "Enrollment". |
||
  |
Step 2In the "Enrollment" submenu, click "Swap Classes". In the "Enrollment" submenu, tap "Swap Classes". |
||
  |
Step 3Next, find the class you would like to swap and click "Swap This Class" on the right hand side of the page. Next, find the class you would like to swap and tap "Swap This Class". |
||
  |
Step 4
This will give you a list of options. You can either:
This will give you a list of options. You can either:
|
||
  |
Step 5If you choose to swap with Class Search, it will bring you to the standard class search interface. Set your filters then click "Search". If you choose to swap with Class Search, it will bring you to the standard class search interface. Set your filters then tap "Search". |
||
Additional ResourcesIf you had any trouble completing this tutorial, or have additional questions please check out our additional resources here.
|
Login to ctcLinkClick here to login to ctcLinkctcLink for StudentsThe ctcLink for Students page has resources on troubleshooting, help sessions and moreShoreline Support CenterIn the Shoreline Support Center you can view self help articles, chat with an agent and submit support request tickets |
Class Information
How to browse for classesIn this tutorial we will walk through how to browse for classes in ctcLink. |
You can hover or click on the included screenshots in the Desktop tutorial for a zoomed-in
view
Choose Tutorial Type:
|
||
  |
Browse for classes: Step 1From the "Class Search" page, open the sidebar menu and click "Browse Classes". From the "Class Search" page, open the sidebar menu and tap "Browse Classes". |
||
 |
Browse for classes: Step 2Then, set your desired filters and click "Search". Then, set your desired filters and tap "Search". |
||
  |
Browse for classes: Step 3When you've found the class you're looking for, click "View sections" on the right side of the page to view sections for that class. Once you've found the class you're looking for, tap "View Sections" to view sections for that class. |
||
  |
Browse for classes: Step 4From here, you can click on the Section ID to see more information about that class. From here, you can tap on the "View" to see more information about that class. |
||
Additional ResourcesIf you need any assistance accessing the schedule, or if you're recieving any errors; please visit our Support Center |
Shoreline Support CenterClick here to go to the Shoreline Support Center |
How to search for classesIn this tutorial we will walk through how to search for classes in ctcLink. |
You can hover or click on the included screenshots in the Desktop tutorial for a zoomed-in
view
Choose Tutorial Type:
|
||
 |
Search for classes: Step 1Once you've clicked the class schedule link, you'll be brought right into the class search page. Here you can set your filters for what you're trying to find, then click "Search". Once you've clicked the class schedule link, you'll be brought right into the class search page. Here you can set your filters for what you're trying to find, then tap "Search". |
||
 |
Search for classes: Step 2Once you've searched for classes, you can click on the Section ID to see more information about that class. Once you've searched for classes, you can tap on the "view" button to view more information about that class. |
||
Additional ResourcesIf you need any assistance accessing the schedule, or if you're recieving any errors; please visit our Support Center |
Shoreline Support CenterClick here to go to the Shoreline Support Center |
How to use the course catalogIn this tutorial we will walk through how to use the course catalog in ctcLink. |
You can hover or click on the included screenshots in the Desktop tutorial for a zoomed-in
view
Choose Tutorial Type:
|
||
 |
Course Catalog: Step 1From the "Class Search" page, open the sidebar menu and click "Course Catalog". From the "Class Search" page, open the sidebar menu and tap "Course Catalog". |
||
 |
Course Catalog: Step 2From here, you can either filter the available subjects or once you've found the subject you're looking for you can click "View Courses" From here, you can either filter the available subjects or once you've found the subject you're looking for you can tap "View Courses" |
||
 |
Course Catalog: Step 3From here, find the class you're looking for and click "View Sections" From here, find the class you're looking for and tap "View Sections" |
||
 |
Course Catalog: Step 4On the "Sections" page, you can click on the Section ID to see more information about that class. From here, you can tap on the "View" to see more information about that class. |
||
Additional ResourcesIf you need any assistance accessing the schedule, or if you're recieving any errors; please visit our Support Center |
Shoreline Support CenterClick here to go to the Shoreline Support Center |
View Your Class Schedule [4 steps]This tutorial will walk through how to view your class schedule in ctcLink |
You can hover or click on the included screenshots in the Desktop tutorial for a zoomed-in
view
Choose Tutorial Type:
|
||
  |
Step 1In the sidebar menu, click "Schedule" Open the sidebar menu, then tap "Schedule" |
||
  |
Step 2Here you can view your class schedule in "Calendar View" Here you can view your class schedule "Calendar View" |
||
  |
Step 3To view your class schedule in "List View", click the "List" button in the top right corner of the screen To view your class schedule in "List View", tap the "List" button in the top of the screen |
||
  |
Step 4From either view of the "Schedule" page; you can view different date ranges, filter for different schedule items, print your schedule and download your schedule to your phone or laptop calendar From either view of the "Schedule" page; you can view different date ranges, filter for different schedule items, print your schedule and download your schedule to your phone or laptop calendar |
||
Additional ResourcesIf you had any trouble completing this tutorial, or have additional questions please check out our additional resources here.
|
Login to ctcLinkClick here to login to ctcLinkctcLink for StudentsThe ctcLink for Students page has resources on troubleshooting, help sessions and moreShoreline Support CenterIn the Shoreline Support Center you can view self help articles, chat with an agent and submit support request tickets |
How to use the Planner to plan your class schedule [7 steps]In this tutorial we will be walking through how to use the Planner section of ctcLink to plan your class schedule |
You can hover or click on the included screenshots in the Desktop tutorial for a zoomed-in
view
Choose Tutorial Type:
|
||
  |
Step 1Click "Enrollment" in sidebar menu Open the sidebar menu, then tap "Enrollment" |
||
  |
Step 2Click "Planner" in the "Enrollment" submenu In the submenu for "Enrollment", tap "Planner" |
||
  |
Step 3Here, you can view the courses you've added to your Planner; or you can click "add course" in the top right corner of the page to add a new course to your Planner Here you can either view the courses currently in your Planner, or you can add more courses by tapping "Add Course" at the top of the page |
||
  |
Step 4You can either search or filter for the subject of the class you're looking for Here you can either search or filter for the subject of the class you're looking for |
||
  |
Step 5Once you've found the subject you're looking for, click "view courses" on the right hand side of the subject Once you've found the subject you're looking for, click 'view courses' on the right hand side of the subject |
||
  |
Step 6Here you can view all courses for the subject you selected. Once you find the course you're looking for, you can either click the name of the course to get more information or you can click "Add to Planner" on the right hand side to add it to your Planner Here you can view all courses for the subject you selected. Once you find the course you're looking for, you can either tap the name of the course to get more information or you can tap 'Add to Planner' to add it to your Planner |
||
  |
Step 7From here, you can either continue to add courses to your Planner or you can click "Planner" at the top of the page or in the sidebar menu to view your Planner From here, you can either continue to add courses to your Planner; or to view your Planner you can click the back arrow at the top of the page or open the sidebar menu and tap "Planner" |
||
Additional ResourcesIf you had any trouble completing this tutorial, or have additional questions please check out our additional resources here.
|
Login to ctcLinkClick here to login to ctcLinkctcLink for StudentsThe ctcLink for Students page has resources on troubleshooting, help sessions and moreShoreline Support CenterIn the Shoreline Support Center you can view self help articles, chat with an agent and submit support request tickets |
Academics
How to View your grades [3 steps]In this tutorial, we will be walking through how to view your grades in ctcLink |
You can hover or click on the included screenshots in the Desktop tutorial for a zoomed-in
view
Choose Tutorial Type:
|
||
  |
Step 1In the sidebar menu, click "Academics" Open the sidebar menu, then tap "Academics" |
||
  |
Step 2Click "Grades" in the "Academics" submenu Tap "Grades" in the "Academics" submenu |
||
  |
Step 3Here is where you would view your grades Here is where you would view your grades |
||
Additional ResourcesIf you had any trouble completing this tutorial, or have additional questions please check out our additional resources here.
|
Login to ctcLinkClick here to login to ctcLinkctcLink for StudentsThe ctcLink for Students page has resources on troubleshooting, help sessions and moreShoreline Support CenterIn the Shoreline Support Center you can view self help articles, chat with an agent and submit support request tickets |
View Academic Progress [3 steps]In this tutorial, we will walk through how to view your acadmic progress |
You can hover or click on the included screenshots in the Desktop tutorial for a zoomed-in
view
Choose Tutorial Type:
|
||
  |
Step 1Click "Academics" in the sidebar menu Open the sidebar menu, then tap "Academics" |
||
  |
Step 2Click "Degree Progress" in the "Academics" submenu Tap "Degree Progress" in the "Academics" submenu |
||
  |
Step 3Here you can view your academic progress and information about the degree you're pursuing Here you can view your academic progress and information about the degree you're pursuing |
||
Additional ResourcesIf you had any trouble completing this tutorial, or have additional questions please check out our additional resources here.
|
Login to ctcLinkClick here to login to ctcLinkctcLink for StudentsThe ctcLink for Students page has resources on troubleshooting, help sessions and moreShoreline Support CenterIn the Shoreline Support Center you can view self help articles, chat with an agent and submit support request tickets |
View/Print your Unofficial TranscriptIn this tutorial, we will be walking through how to view or print your unofficial academic transcript |
You can hover or click on the included screenshots in the Desktop tutorial for a zoomed-in
view
Choose Tutorial Type:
|
||
  |
Step 1Click "Academics" in the sidebar menu Open the sidebar menu, then tap "Academics" |
||
  |
Step 2Click "View Unofficial Transcript" in the sub menu Tap "View Unofficial Transcript" in the sub menu |
||
  |
Step 3Click "View PDF" to either view or print your unofficial transcript Tap "View PDF" to either view or print your unofficial transcript |
||
Additional ResourcesIf you had any trouble completing this tutorial, or have additional questions please check out our additional resources here.
|
Login to ctcLinkClick here to login to ctcLinkctcLink for StudentsThe ctcLink for Students page has resources on troubleshooting, help sessions and moreShoreline Support CenterIn the Shoreline Support Center you can view self help articles, chat with an agent and submit support request tickets |
Financial Information
View tax information/1098-T [3 steps]Learn how to view your tax information (1098-T) in ctcLink. |
You can hover or click on the included screenshots in the Desktop tutorial for a zoomed-in
view
Choose Tutorial Type:
|
||
  |
Step 1First, log into ctcLink. Then, open the sidebar menu and click "Financials". First, log into ctcLink. Then, open the sidebar menu and tap "Financials". |
||
  |
Step 2In the "Financials" submenu, click "View 1098-T". In the "Financials" submenu, tap "View 1098-T". |
||
  |
Step 3Here is where you would see all of your tax information/1098-T. Here is where you would see all of your tax information/1098-T. |
||
Additional ResourcesIf you had any trouble completing this tutorial, or have additional questions please check out our additional resources here.
|
Login to ctcLinkClick here to login to ctcLinkctcLink for StudentsThe ctcLink for Students page has resources on troubleshooting, help sessions and moreShoreline Support CenterIn the Shoreline Support Center you can view self help articles, chat with an agent and submit support request tickets |
Check your account balance [3 steps]In this tutorial, we will walk through how to check your account balance. |
You can hover or click on the included screenshots in the Desktop tutorial for a zoomed-in
view
Choose Tutorial Type:
|
||
  |
Step 1In the sidebar menu, click "Financials". Open the sidebar menu, then tap "Financials". |
||
  |
Step 2In the "Financials" submenu, click "What I Owe". In the "Financials" submenu, tap "What I Owe". |
||
  |
Step 3On this page, you can view your outstanding balance, or you can click "Make A Payment" to make a payment. On this page, you can view your outstanding account balance. |
||
NoteIf you have enrolled in classes but are unable to see the tuition you owe in the What I Owe section, follow these instructions. If you have enrolled in classes but are unable to see the tuition you owe in the What I Owe section, follow these instructions. |
|||
Additional ResourcesIf you had any trouble completing this tutorial, or have additional questions please check out our additional resources here.
|
Login to ctcLinkClick here to login to ctcLinkctcLink for StudentsThe ctcLink for Students page has resources on troubleshooting, help sessions and moreShoreline Support CenterIn the Shoreline Support Center you can view self help articles, chat with an agent and submit support request tickets |
Make a payment [7 steps]In this tutorial, we will walk through how to check your account balance, make a payment, view past payments and how to set up a payment plan. |
You can hover or click on the included screenshots in the Desktop tutorial for a zoomed-in
view
Choose Tutorial Type:
|
||
|
Step 1In the sidebar menu, click "Financials". Open the sidebar menu, then tap "Financials". |
||
|
Step 2In the "Financials" submenu, click "What I Owe". In the "Financials" submenu, tap "What I Owe". |
||
|
Step 3On this page, you can view your outstanding balance, or you can click "Make A Payment" to make a payment. On this page, you can view your outstanding account balance. |
||
 |
Step 4
This will take you to the alternate view of ctcLink. If the interface looks different, don't worry; it's supposed to. On this page, you can view your outstanding balance; but you can also see your payment history, make a payment or set up a payment plan. This step cannot be done on a mobile device, please switch to a desktop or laptop if you would like to make a payment or set up a payment plan. |
||
 |
Step 5To make a payment, click on the "Payments" option in the sidebar menu, then select "Make A Payment" from the "Payments" submenu. This step cannot be done on a mobile device, please switch to a desktop or laptop if you would like to make a payment or set up a payment plan. |
||
 |
Step 6Next, fill in the amount you would like to pay at this time, then click "Next". This step cannot be done on a mobile device, please switch to a desktop or laptop if you would like to make a payment or set up a payment plan. |
||
 |
Step 7Next, you will be presented with a page that will take you to the payment portal. Click "Continue to Make Payment" to proceed to the payment portal. This step cannot be done on a mobile device, please switch to a desktop or laptop if you would like to make a payment or set up a payment plan. |
||
Additional ResourcesIf you had any trouble completing this tutorial, or have additional questions please check out our additional resources here.
|
Login to ctcLinkClick here to login to ctcLinkctcLink for StudentsThe ctcLink for Students page has resources on troubleshooting, help sessions and moreShoreline Support CenterIn the Shoreline Support Center you can view self help articles, chat with an agent and submit support request tickets |
Enroll in a payment plan [7 steps]In this tutorial, we will walk through how to enroll in a payment plan. This process can only be done on a desktop or a laptop, and cannot be done on a mobile device. |
You can hover or click on the included screenshots in the Desktop tutorial for a zoomed-in view | ||
Step 1Log into the full version of ctcLink (also called PeopleSoft) using this link: https://gateway.ctclink.us/. This will take you to an alternate view of ctcLink. If this version looks different from the ctcLink screens you are used to, don't worry, its supposed to.
|
|||
 |
Step 2If you attend multiple colleges, when prompted, select Shoreline Community College from the list.
|
||
 |
Step 3In the left-side menu, select the 'Student Homepage' button.
|
||
 |
Step 4On the Student Homepage, select the 'Financial Account' tile.
|
||
 |
Step 5On the left side menu, select 'Payment Plans'.
|
||
 |
Step 6From the drop-down, select 'Nelnet Payment Plan', then click the 'Nelnet' button.
|
||
 |
Step 7This will take you to the Nelnet account creation form. Follow the prompts to set up your Nelnet Payment Plan.
|
||
Additional ResourcesIf you had any trouble completing this tutorial, or have additional questions please check out our additional resources here.
|
Login to ctcLinkClick here to login to ctcLinkctcLink for StudentsThe ctcLink for Students page has resources on troubleshooting, help sessions and moreShoreline Support CenterIn the Shoreline Support Center you can view self help articles, chat with an agent and submit support request tickets |
Personal Information
How to view and edit your Contact Information, Biographical Information and Emergency ContactsIn this tutorial, we will walk through how to view or edit your contact infomation, biographical information and emergency contacts in ctcLink. Be aware, if you update your preferred email in ctcLink that will be the email that all Shoreline communications are delivered to. |
You can hover or click on the included screenshots in the Desktop tutorial for a zoomed-in
view
Choose Tutorial Type:
|
||
  |
Step 1After you log into ctcLink, click "My Profile" in the sidebar menu. After you log into ctcLink, open the sidebar menu and tap "My Profile" |
||
  |
Step 2In the "My Profile" submenu, click "General Information". In the "My Profile" submenu, tap "General Information". |
||
  |
Step 3On this page, you can see your Student ID, the last four digits of your SSN, your preferred name and the programs you're registered in. From here, click "Biographical Info" at the top of the page. On this page, you can see your Student ID, the last four digits of your SSN, your preferred name and the programs you're registered in. From here, tap "Biographical Info" at the top of the page. |
||
  |
Step 4On this page, you can update your preferred name (1), your gender identity and your ethnicity (2). Once you're done with this section, click "Contact Info" (3). On this page, you can update your preferred name, your gender identity and your ethnicity. Once you're done with this section, tap "Contact Info". |
||
  |
Step 5On this page you can update your addresses, add a current address or add a future address. You can also add and edit your email and phone numbers. Be aware, if you update your preferred email in ctcLink that will be the email that all Shoreline communications are delivered to. Once you're done with this section, click "Emergency Contacts" at the top of the page. On this page you can update your addresses, add a current address or add a future address. You can also add and edit your email and phone numbers. Be aware, if you update your preferred email in ctcLink that will be the email that all Shoreline communications are delivered to. Once you're done with this section, tap "Emergency Contacts" at the top of the page. |
||
  |
Step 6On this page, you can add or update your emergency contacts and their contact information. On this page, you can add or update your emergency contacts and their contact information. |
||
Additional ResourcesIf you had any trouble completing this tutorial, or have additional questions please check out our additional resources here.
|
Login to ctcLinkClick here to login to ctcLinkctcLink for StudentsThe ctcLink for Students page has resources on troubleshooting, help sessions and moreShoreline Support CenterIn the Shoreline Support Center you can view self help articles, chat with an agent and submit support request tickets |